Certification Board
There’s one thing most athletes and new pole vault coaches never think to question: the number printed on the top of their poles. That weight rating — 130, 150, 170 — feels like a fact. But it’s not. It’s an approximation, and depending on the manufacturer, it can be a pretty loose one.
This post covers why you should flex test your own poles, how we do it at PVSCB, and where to find other approaches if ours isn’t your style. The method matters less than the doing.
A quick caveat: if your program only uses one brand of pole — all Spirit, all Essx, all Pacer, etc. — this article probably isn’t worth your time. Within a single manufacturer’s line, the weight ratings are consistent enough that you can trust the labels and the transitions between poles. Where flex testing pays off is when your shed is a mix of brands, which is the reality for most high school and club programs. That’s when the numbers on the labels stop telling the same story.
A flex test measures how much a pole deflects (bends) from its resting position when a standardized weight is applied. The concept comes from beam theory and was adapted for vaulting poles by composite engineers in the 1950s and 60s. A formula converts that measured deflection into a load-bearing number that athletes and coaches understand as a “weight rating” — similar to how fishing line is rated by test weight. Early fiberglass poles like the Browning Skypole even had charts on their labels telling the vaulter how high to grip based on body weight.
The problem? There is no universal industry standard for how manufacturers measure flex. Each company uses its own span lengths, support point positions, and methods. ASTM Subcommittee F08.67 explored creating a national standard for pole flex testing but ultimately determined it was impractical due to cost and the fundamental differences in how poles are designed — sailpiece size, shape, location, and materials all vary from brand to brand.
That means weight ratings are, in effect, proprietary numbers. A 150 from one company is not the same as a 150 from another.
The Pole Vault Safety Certification Board advocates a straightforward approach to flex testing that any coach can do:
That deflection is your flex number. A lower number means a stiffer pole. A higher number means a softer pole.
That’s it. It’s simple, repeatable, and gives you a number you can compare across every pole in your shed — regardless of brand, age, or what’s printed on the label.
The beauty of this method is that you don’t need to match the manufacturer’s exact testing parameters. You’re not trying to reverse-engineer their rating. You’re creating your own consistent baseline so you can rank your poles by actual stiffness and know the true gaps between them.
In our PVSCB study material, we use a Relative Stiffness chart that shows how different pole lengths and weights compare in terms of resistance. The idea is that you don’t need every combination of length and weight in your shed to build a consistent pole series.
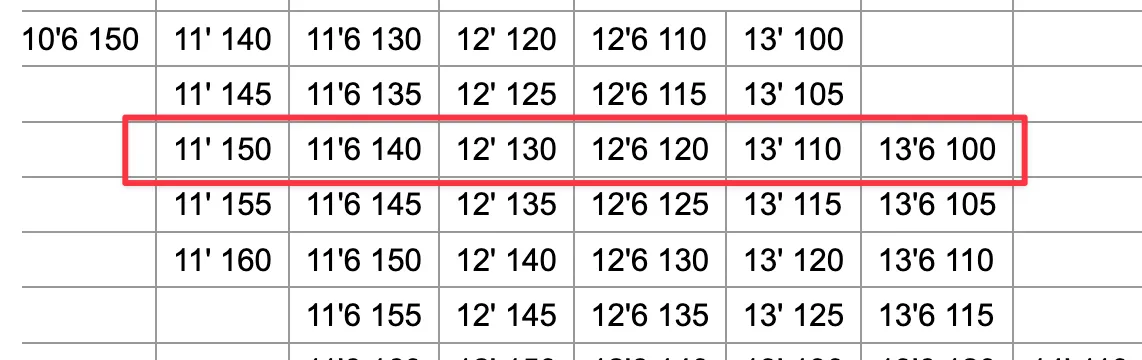
For example, look at the highlighted row. If you hold at 11’ on any one of those poles — an 11’ 150, an 11’6 140, a 12’ 130, a 12’6 120, a 13’ 110, or a 13’6 100 — the resistance should be about the same, generally speaking. It will feel different and react differently when you actually jump on it because of the sailpiece location and a lot of other factors, but that’s too much science for this post. Keep it simple and follow the 6" of grip = 10lbs of stiffness up or down the pole.
Now, this chart gets blown out of the water when your pole series looks like this:
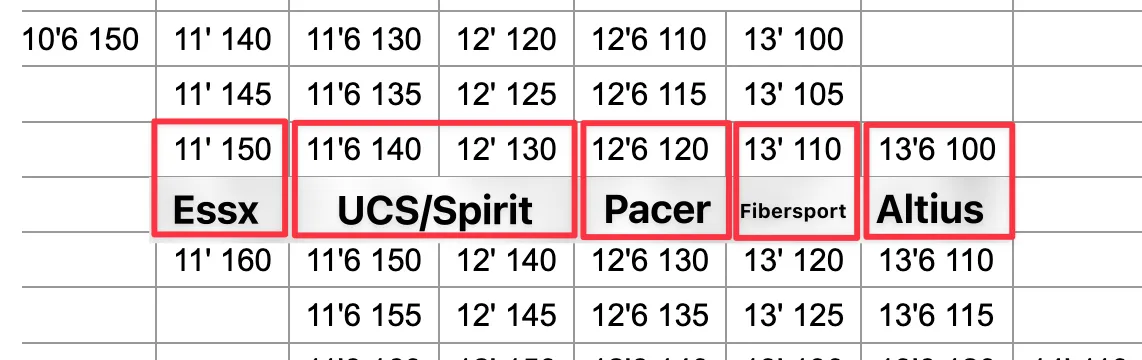
Uh oh. Now you’ve got a problem. The lengths and weights are the exact same, but each one is made from a different manufacturer. Why does this matter?
Pole manufacturers determine their weight ratings differently. A 150 Essx or Altius is not the same as a 150 Spirit or Pacer. In my experience, those poles can vary by as much as 15 lbs of resistance. That means a Spirit or a Pacer FX/FXV is going to feel a lot stiffer than the Essx when you jump on it, even though they're rated the same weight (150).
And it goes deeper than just cross-brand differences. Many manufacturers have multiple lines within their own brand. Today in 2026, Pacer offers the One, FXV, and Composite. Altius and FiberSport each have standard fiberglass models plus carbon options, in addition to elite sponsored models (Altius has the Adrenaline and FiberSport has the Kendricks). And that’s just the tip of the iceberg. Every pole ever made is unique — they are built by hand, and every manufacturer has their own way of determining resistance.
The fix for this problem is to flex your own poles and assign a number to each one. This gives you one more data point to make sure your athlete is jumping on a pole that is safe for them and appropriate for their progression. Injuries can happen in any sport, even under the watch of an experienced coach. That extra data point helps you make a more informed decision every time you hand an athlete a pole.
This video describes the process perfectly: Watch the Flex Test Demo
When you flex test every pole in your program, you can:
Confidence is everything in pole vault. Having a series of poles that you know is consistent from one pole to the next is key to building an athlete’s trust and progression.
Most schools only have about 10–20 poles in the shed, and they’re all various lengths and weights from different eras and different brands. It’s hard to build confidence when your 12’ 130 is too small and the next pole up is a 12’6 160. That’s not a step — that’s a cliff. And without flex testing, you might not even realize the cliff is there.
Let’s be upfront about what flex testing can’t do. Different brands use different sailpiece locations, shapes, and construction methods. It has been demonstrated By Gill through extensive testing that even poles with identical flex numbers can produce different end loads at deeper bends — meaning they perform differently in an actual vault. Flex testing won’t tell you how a pole bends (high or low), how it recoils, or how it rolls over to vertical. These are legitimate limitations, and critics of DIY flex testing are right to point them out.
But here’s what it does tell you: relative stiffness. Not the full story — but the chapter that matters most when you’re deciding which pole to hand an athlete next. Kris Allison, who has been flexing poles for over 20 years and has built four different testing devices, put it bluntly: until the industry adopts a standard, flexing your own poles is the only failsafe to know your true transitions in stiffness across brands and lengths. A partial picture is better than no picture at all — and for building a safe, logical pole series, relative stiffness is the foundation.
You don’t need an engineering degree to flex test your poles. You need two solid supports, a 50 lb weight, a meter stick, and a Saturday morning. Make it a team activity — get your athletes involved and assign roles so everyone has a job: recording data, hanging the weight, reading the deflection, rotating poles in and out. It goes fast once you get a rhythm. Do it once per pole and it’s done. Log the numbers, and sort your poles by what they actually are — not what the label says.
Your vaulters will thank you. And more importantly, they’ll be safer.